Hydro Axis heat mats are high quality, flexible heat mats with a very smooth surface for better heat transfer. This helps to make them more energy efficient than their cheaper counterparts.
These heat mats are designed to warm the root area by 5.5-11 °C above ambient temperature, which will increase the success rate of seedlings and cuttings.
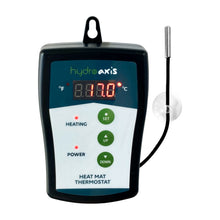
Use the included Hydro Axis heat mat thermostat to help set & maintain a more precise temperature.
The Hydro Axis heat mat is 50cm wide and comes in three different lengths; 25cm, 50cm and a massive 120cm!
They are very easy to clean and no need to worry about spills, as they are IP64 water resistant.
For better results, place the heat mat on an insulated surface, like wood, cardboard or foam board. Be careful with varnished wood surfaces, as this can cause discolouration.
Specifications (small)
- 50cm x 25cm (fits one prop box)
- 230V~ 50Hz - 20 Watt
- Cord length 1.8m
- IP64 Rated
- Compatible with any thermostat
- Warranty 1 year
Specifications (medium)
- 50cm x 50cm (fits 2 prop boxes)
- 230V~ 50Hz - 45 Watt
- Cord length 1.8m
- IP64 Rated
- Compatible with any thermostat
- Warranty 1 year
Specifications (large)
- 50cm x 120cm (fits 4-5 prop boxes)
- 230V~ 50Hz - 100 Watt
- Cord length 1.8m
- IP64 Rated
- Warranty 1 year
Specifications (thermostat)
- Precise Temperature Control: 20-42°C / 68-108°F
- Digital temperature controller for heat mats
- Provides constant optimum temperature for your plants
- Easy to use, plug heat mat directly into thermostat
- 1.8m power cord
- 2m probe with suction cup
- LED temperature reading
- Power/Heating Indicator light
- Instruction Manual included
- Voltage 230-240V~ 50Hz
- Maximum Load 1000 Watt
- Indoor use only
- Use with our Hydro Axis Flexible Heat Mats
- Warranty: 1 year
Setting up the controller
- Insert the probe approximately 20-40mm into the rooting area.
- Position the thermostat up and away from seedling trays and stray water.
DO NOT SUBMERGE THE THERMOSTAT. - Plug the heat mat into the thermostat.
- Plug the thermostat power cord into the power source/electrical outlet, and the POWER LED will light up.
- Set the maximum desired temperature for the heat mat.
Using the controller
- Press the SET button to display the current pre-set temperature. The thermostat's LED screen shows the current temperature whenever the SET button is not activated.
- Press and hold the SET button for three seconds to enter temperature selection mode. Press the ▲ (UP) or ▼ (DOWN) button to adjust the temperature. The thermostat LED screen shows the numbers as you cycle through them. Press the SET button again to set the chosen temperature. The HEATING light cycles on when the mat is in the process of heating. When the LED is not lit, the mat is not providing heat. The light turns off automatically when the mat reaches the pre-set temperature.
- Press and hold the ▼ (DOWN) button for three seconds to display the temperature in Celsius. Press and hold the ▲ (UP) button to display the temperature in Fahrenheit.
Please note:
When you order multiple items: Retail boxes will be shipped out separately and may incur an extra shipping cost. Heat mats without retail box will be sent rolled up to save space.
Due to their size, the larger heat mats may arrive with some wrinkling, this will smooth out with time and use. You can speed up this process by plugging in your heat mat, leave it to warm up for about 30 minutes. Then unplug it, roll it up while still warm with the top side down (printing on the outside of the roll) and leave it to cool down for a while.
Have a question?
Contact us via the Live Chat (bottom right corner) or send us a message.


